Flat Lay Image Editing
We provide professional flat lay image editing services for fashion brands, apparel businesses, and eCommerce stores that need clean, consistent, and sales-ready product images. Our editing process enhances garment presentation while preserving natural fabric texture, accurate colors, and true product details.
Starting at $0.99 per image
6–12 hours fast delivery
Always available 24/7 support
ECommerce-ready output
Professional flat lay image editing services help you increase photo sales in extraordinary ways
We proudly serve satisfied clients worldwide.
We are a high-end photo editing agency delivering refined, professional visuals for Fashion brands, E-commerce brand owners, photographers, and Online sellers. Every image is carefully retouched to reflect quality, precision, and brand excellence—helping your products stand out and sell with confidence.
Supported by a dedicated team of over 100 professional retouchers, we are recognized for our reliability, quick delivery, secure workflows, and consistent quality. From fashion to product imagery, our customized retouching process follows precise client instructions and a strict 3-step quality control system—delivering visually striking, conversion-ready images every time.
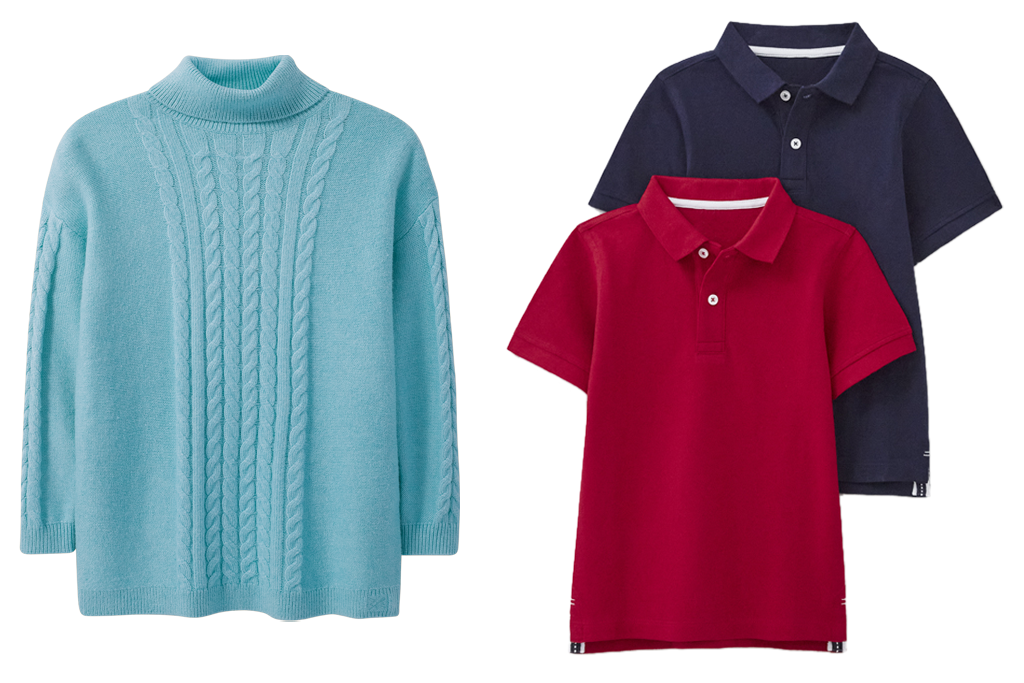
Flat Lay Image Editing for E-Commerce Brands
We provide professional flat lay image editing services for fashion brands, apparel businesses, and eCommerce stores that need clean, consistent, and sales-ready product images. Our editing process enhances garment presentation while preserving natural fabric texture, accurate colors, and true product details.
📢 Flat lay image editing includes:
- Fabric cleanup (dust, lint, wrinkles & creases removal)
- Color correction & tone balancing
- Natural shadow enhancement for realistic depth
- Image resizing & optimization for eCommerce platforms


Creative Flat Lay Photo Styling & Refinement
For brands using flat lay photography as part of creative storytelling, we refine layout positioning, enhance object details, balance tones, and clean up compositions — delivering aesthetically pleasing visuals perfect for campaigns, banners, and social media marketing.
📢 Why clients work with us:
- Fast delivery within 6–12 hours
- Consistent editing quality for bulk orders
- E-commerce-ready images that meet platform guidelines


Flat Lay Image Editing for Fashion & Apparel Brands
Our premium flat lay image editing service helps fashion brands present their products with a high-end, professional look.
We enhance garment structure, color accuracy, and visual balance while maintaining the true fabric feel.
📢 What makes us different:
- 100% manual editing (no AI shortcuts)
- Natural results with no over-retouching
- Scalable service for large fashion collections


Flat Lay Editing for DTC & Lifestyle Brands
Direct-to-consumer brands rely on premium visuals to drive conversions. We edit flat lay content to enhance product textures, maintain color fidelity, and create scroll-stopping presentations that support advertising, Instagram content, and web storefronts.


High-Quality Flat Lay Image Editing That Sells
Make your products stand out with clean, professional flat lay image editing designed to increase clicks and conversions. We enhance every detail—perfecting backgrounds, correcting colors, refining shadows, and sharpening edges—so your products look polished, premium, and ready to sell on any platform.


- Free trial available
- Fast and reliable turnaround
- 24/7 dedicated client support
- Guaranteed privacy & data security
- Special discounts for bulk orders
- Unlimited revisions until satisfaction
- Your satisfaction is our top priority
- Modern tools for superior results
- Cost-effective pricing for all projects
- Expert-level photo editing quality
- Every edit tailored to your exact needs

Why Choose Our Flat Lay Image Editing Service for Your Business
Our professional flat lay image editing service is designed to enhance your product photos, making them visually appealing, consistent, and ready to convert viewers into buyers. We specialize in precise flat lay photo retouching, ensuring every image looks clean, balanced, and professionally styled. From color correction and exposure adjustment to background cleanup and shadow enhancement, we refine each detail to present your products at their best. Our flat lay image editing services are ideal for: E-commerce platforms (Amazon, Shopify, Etsy, eBay), Fashion brands, Digital ads, and catalogs. We ensure your images meet platform guidelines while maintaining a consistent, high-end look that strengthens your brand identity. We understand the importance of time in online business.
Our streamlined workflow ensures fast turnaround times without compromising quality. Whether you need a few images or thousands, our flat lay image editing service scales to meet your business needs. Hiring an in-house editing team can be expensive. Our affordable flat lay image editing service provides professional results at a fraction of the cost, helping you save time and resources while maintaining consistent quality. When you choose our flat lay image editing service, you’re investing in visuals that enhance brand credibility, increase customer trust, and drive sales. Contact us today to get professional flat lay image editing services tailored to your business goals.
Hear What E-commerce Brands and Photographers Are Saying About Us
Discover how our expert photo editing services have helped businesses and creatives boost their visuals, sales, and brand presence.
Showcase of Our Recent Flat-Lay Photo Editing Projects.
Explore a selection of our latest editing projects, delivered for leading brands, businesses, photographers, and editorial agencies worldwide.


Bring Your Images to life- Start Your Free Trial Now!
Just complete the form, share your images, and we’ll deliver your free trial edit in 1 hour.
- Super-Fast Delivery
- Easy & Hassle-Free Ordering
- Flawless Results Every Time
- Friendly & Reliable Support
- Budget-Friendly Packages
- Full Privacy & NDA Assurance
- Trusted by Clients Across the Globe
How it works
Order your edits
Upload your images, tell us a bit about what you need, and get a clear, budget-friendly price on the spot.
Acceptance
You will receive a free trial edited image and confirm our acceptance.
Final Delivery
we’ll send images via share able link by ( FTP Server/ Wetransfer/Google drive/dropbox/).
Instant Correction
Immediate corrective action is one of our best attributes. Your satisfaction is my first priority.
Payment System
PAYPAL, We are okay with all popular payment methods, so there is nothing to worry about.

Frequently asked questions
Everything you need to know about the product, billing, discounts, and promotions.
What editing services are included in flat lay image editing?
Our service typically includes:
Color correction and exposure adjustment.
Background cleaning or replacement.
Dust, scratch, and imperfection removal.
Shadow and highlight enhancement.
Image cropping, resizing, and alignment.
Web and e-commerce optimization.
Custom editing requests are also available.
Do you provide flat lay image editing for Amazon and Shopify?
Absolutely. We optimize flat lay images according to Amazon, Shopify, Etsy, and eBay guidelines, ensuring correct dimensions, background standards, and resolution for approval and better performance.
Can you match my brand style and color accuracy?
Yes. We ensure accurate color matching and consistent styling across all images. You can provide reference images, brand guidelines, or specific instructions, and our editors will follow them precisely.
How long does flat lay image editing take?
Turnaround time depends on the quantity and complexity of the images. Small orders can be delivered within 12 hours, while bulk projects are completed quickly using scalable workflows.
Is your flat lay image editing service affordable?
Yes. We offer cost-effective flat lay image editing services with flexible pricing for small businesses, agencies, and large e-commerce brands. Bulk discounts are available.
How do I get started?
Getting started is simple:
Upload your flat lay images
Share your editing requirements
Receive a free quote
Get professionally edited images ready to use
Why should I choose your flat lay image editing service?
We combine professional quality, fast turnaround, affordable pricing, and SEO-optimized output. Our goal is to help your business stand out visually and drive more sales through high-quality flat lay images.
Success Stories That Build Trust.
Our global clients inspire us to deliver better results every single day. See what they say about our photo editing services.
Consistent Quality & Fast Delivery!
I’ve been working with photoedite.com for over 6 years and they’ve never missed a deadline. The edits are clean, accurate, and consistent across all product categories. Highly recommended for any e-commerce brand.
Dustin
Oner & CEO
Professional & Easy to Work With
The communication was smooth, the instructions were followed perfectly, and the results were better than expected. Their color correction and retouching work is top-notch.
Sophie Lawson
Founder
Boosted Our Conversion Rates
“We started using their image editing services for our apparel line and saw an immediate improvement in product performance. Better photos = higher conversion. Worth every dollar!”
Oliver Bennett
Co-Founder
Perfect for Amazon & Shopify
“We needed marketplace-compliant images and photoedite.com delivered exactly what we needed for Amazon. Clean backgrounds, great shadows, and accurate colors. They know what they’re doing.”

Robert Hayes
Owner
Reliable Partner for High-Volume Work
“As a studio, we handle thousands of SKUs and they have become our go-to editing partner. Their bulk image processing capability is excellent and the team ensures consistent output across all batches.”
Daniel Fletcher
CEO
Amazing Retouching for Fashion
“Our fashion catalog images came out stunning! Skin tones, fabric details, and color matching were incredibly precise. The flat lay editing exceeded expectations.”
Richard Collins
CFO
Exceeded Expectations!
“Honestly I didn’t expect such high-quality work at this turnaround speed. They understood our brand style right away and executed perfectly. We’ll continue using their services.”
Ryan Douglas
Co-Founder
Great for Real Estate Editing
“We used their real estate photo editing service for our listings and the results were amazing. Bright interiors, realistic window views, and beautiful sky replacements helped us attract more buyers.”
Olivia Bennett
Founder
Perfect for Jewelry Retouching
“Jewelry editing is tricky because of reflections, but they handled it like experts. Our product images now look premium and professional on our website and social media.”
Rebecca Moore
Owner
Exceptional Communication & Workflow
“The team is organized, responsive, and detail-oriented. Delivery links, file naming, revisions — everything was handled smoothly. It feels great to work with a team that understands production workflows.”
Dustin
Oner & CEO
Your 24/7 Communication Partner
Just complete the form, share your images, and we’ll deliver your free trial edit in 1 hour.
Exclusive Perks & Benefits
Enjoy special discounts and rewards that grow with every collaboration.
Empowering Talent
Every payment goes directly to your dedicated photo editor skilled professionals working tirelessly, despite limited opportunities.