Color Correction

Color Correction is most popular these days because there is no need to take color pictures of the same product over and over again. To simplify the workflow of photographers or business owners, our company enhances their business with color correcting and makes clothes more attractive. 

Color correcting is when you dial the color of each shot to make the final image look amazing. It goes to create a specific artistic style in the frames, dialing from the balance of the image to a certain look. There are so many things you can just set. Color correcting it takes it to the next level and it is a necessary part of the image editing. The shot looks at the eye and what seems to be pleasant in the eyes.

Starting at $1.00 per image

Color Correction

Kid's Dress

Color Correction Image Editing is one of the most essential steps in professional photo editing. It ensures your images have accurate, balanced, and visually pleasing colors, which is especially critical for e-commerce, fashion, food photography, and product branding.

📢   Using Photoshop

1. Adjust HSL Settings:
✔ Go to the HSL/Color panel.
✔ Adjust the Hue, Saturation, and Luminance sliders to modify the color of the dress.
2. Use the Color Grading Panel:
✔ You can also use the Color Grading panel for more complex adjustments to shadows, midtones, and highlights.
3. Fine-tune Exposure and Contrast:
✔ Use the Basic panel to adjust overall exposure and contrast if needed.

Women Cloths

To correct the color of a dress in a photo, here’s a step-by-step guide you can follow, using popular editing software like Photoshop or Lightroom:

📦 Example: Color Correction for Fashion Product
ProblemFix
Cloth looks yellowishUse Curves to add Yellow in midtones
Skin tone too redUse Hue/Saturation to tone down reds
Fabric color doesn’t match real productSample real color, match using Selective Color or Replace Color tool

Skin, Dress and Background

Color correction is essential for creating natural-looking, professional-quality images. It ensures that skin tones, clothing colors, and backgrounds appear consistent and true to life. 

For color correction of a dress and background in a photo, here are some steps you can follow using photo editing software like Photoshop or Lightroom:


1. Use the Right Tools:

  • Photoshop: Use the Select Color tool, Hue/Saturation, or Adjustment Layers.
  • Lightroom: Use the HSL (Hue, Saturation, Luminance) panel.

Women Cloth

Color correcting is when you dial the color of each shot to make the final image look amazing. It goes to create a specific artistic style in the frames, dialing from the balance of the image to a certain look. There are so many things you can just set. Color correcting it takes it to the next level and it is a necessary part of the image editing. The shot looks at the eye and what seems to be pleasant in the eyes.

Tips:

  • Always work non-destructively by using adjustment layers or masks.
  • If the dress has intricate patterns, take extra care when selecting to avoid losing detail.
  • Compare with the original image to ensure the color looks natural.

Primum Clolor Correction

Using Lightroom
  1. Import the Photo:

    • Open Lightroom and import the photo you want to edit.
  2. Select the Dress:

    • Use the Adjustment Brush or Radial Filter to paint over the dress. You can also use the Range Mask feature to isolate the color.
  3. Adjust HSL Settings:

    • Go to the HSL/Color panel.
    • Adjust the Hue, Saturation, and Luminance sliders to modify the color of the dress.
  4. Use the Color Grading Panel:

    • You can also use the Color Grading panel for more complex adjustments to shadows, midtones, and highlights.
  5. Fine-tune Exposure and Contrast:

    • Use the Basic panel to adjust overall exposure and contrast if needed.
  6. Export Your Image:

Leave your image edits to the experts

✨ Don’t waste your time on tedious edits. Our skilled Photoshop expert specialize in fashion, apparel, and e-commerce images. From background removal to high-end model retouching — every image is manually perfected by experienced professionals.
✔ Human editing only – no AI shortcuts
✔ Fast turnaround – 12 to 48 hours
✔ Bulk discounts for photographers & brands

  • Leave Your Image Edits to the Experts
    Your photos deserve the precision only professionals can provide.

  • Expert Hands. Flawless Results.
    Let us handle the editing while you focus on your craft.

  • We Edit. You Create.
    Leave the retouching, background removal, and polishing to our team.

How it works

 1. Order your edits

Upload your images, tell us a bit about what you need, and get a clear, budget-friendly price on the spot.

2. Acceptance

You will receive a free trial edited image and confirm our acceptance.

3. Final Delivery

we’ll send images via share able link by ( FTP Server/ Wetransfer/Google drive/dropbox/).

4. Instant Correction

Immediate corrective action is one of our best attributes. Your satisfaction is my first priority.

5. Payment System

PAYPAL, We are okay with all popular payment methods, so there is nothing to worry about.

photoedite

Delivery Time and Pricing

Fast Turn Around is our strength. Starting from Flexible 12-hour to 24 hour delivery which is followed by ASAP 1-hour, 6-hour, and 12-hour services for special urgency.

Free Trial: 3 – 5 Images. Multiple Quality Checks.  Easy Cancellation

FAQ (Frequently Asked Questions)
Color correction in Photoshop can greatly enhance your images. Here’s a step-by-step guide to help you get started:

1. Open Your Image

  • Launch Photoshop and open the image you want to correct.

2. Use Adjustment Layers

  • Create a New Adjustment Layer: Go to the Layers panel, click the “New Adjustment Layer” icon (half-filled circle), and choose the appropriate adjustment (e.g., Levels, Curves, Color Balance, or Hue/Saturation).

3. Levels Adjustment

  • Select Levels to adjust the shadows, midtones, and highlights.
  • Move the sliders to set black, white, and gray points based on the histogram.

4. Curves Adjustment

  • Use Curves for more precise control over the tonal range and color channels.
  • Click to create points on the curve and drag to adjust the brightness and contrast.

5. Color Balance

  • Open Color Balance to adjust the colors in shadows, midtones, and highlights separately.
  • Tweak the sliders to enhance or correct color casts.

6. Hue/Saturation

  • Use Hue/Saturation to adjust the overall color intensity or change specific colors.
  • Adjust the sliders to increase or decrease saturation and modify hue.

7. Selective Color

  • This adjustment allows you to fine-tune specific color ranges.
  • Choose a color from the drop-down menu and adjust the sliders to modify it.

8. White Balance Correction

  • If your image has a color cast, use Camera Raw Filter (Filter > Camera Raw Filter).
  • Use the Temperature and Tint sliders to adjust the white balance.

9. Final Touches

  • Check for consistency and ensure the colors look natural.
  • Use the History panel to compare before and after adjustments.

10. Save Your Work

  • Save your edited image in the desired format (File > Save As).

Why E-commerce Owners or Fashion & Apparel choose our Color correction services

🎨 Do What You Love — Let Us Handle the Editing

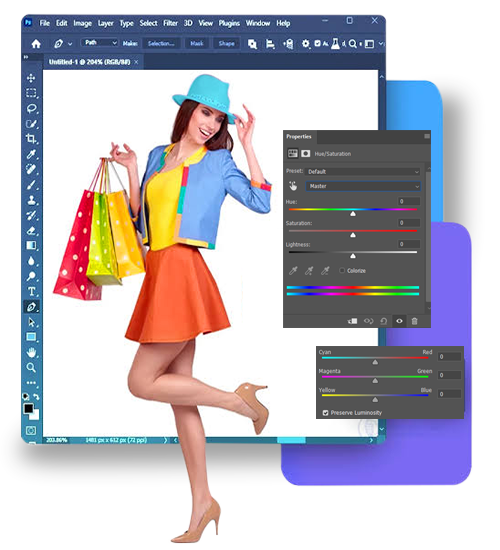
Your talent and creative energy are best spent on what you do best — shooting, styling, creating.
Not burning hours in Photoshop trying to piece together neck joins, sleeves, and back parts to build invisible mannequins.

Let our expert retouchers handle the ghost mannequin process with precision and speed — so you can focus on your passion.

happay customers
photoedite
FIND YOUR FAVOURITES ╰┈➤
photoedite

Let Us Handle the Edits — You Focus on Creating. So you can get back to doing what inspires you.

© Copyright 2025 – Photo Edite – All Rights Reserved.