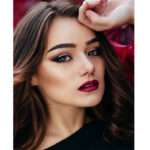
Photo Retouching
Photo retouching is the process of altering an image to prepare it for final presentation. The term “retouch” refers to the act of improving the appearance of an image. In photography, restoration is the removal of certain defects from an image. It could be small objects like dust or dirt on the camera lens or sensor. Retouching can be used to remove some physical imperfections in the skin of models commonly seen in fashion publications.


Your Benefits:
◎ 100% satisfaction,
◎ High-Quality Work,
◎ Unlimited Revision
◎ Super Fast Delivery,
Delivery Time.
Fast Turn Around is our strength. Starting from Flexible 24-hour to 48-hour delivery which is followed by ASAP 1-hour, 6-hour, and 12-hour services for special urgency.
Professional Photo Retouch
Our company enables you to customize your retouching needs. We have an amazing team with perfect techniques and tools for both product and model retouching.


High-end Photo Retouching
To start Price is only $2.00 -4.99
High-end Photo Retouching is the process of beautifying any image without distorting even a single pixel. High-end photo retouching entails analyzing, contouring, erasing defects, smoothing textures, and other techniques.


Headshot Retouching
To start Price is only $2.00 – $4.50
Headshot Retouching is the process of correcting imperfections in a portrait. It can be anything from eliminating subtle irregularities, blemishes, or scars to enhancing the overall image by performing High-end Retouching.


Patroite Retouching
To start Price is only $2.00 – $4.50
Portrait Retouching is the process of correcting imperfections in a portrait. It can be anything from eliminating subtle irregularities, blemishes, or scars to enhancing the overall image by performing High-end Retouching.

Product Photo Retouching
To start Price is only 1$ – 3.50$
For an e-commerce business owner, it is mandatory to keep the image more interesting and impressive and photographers use their previous images to attract the attention of others. So using retouching services is a good option for e-commerce owners and photographers. When it comes to product photos, there are many refactoring enhancements that can be made to make the photos look more appealing to potential customers. These adjustments are applied to make the final image more attractive to potential customers. In photo retouching services, adjustments are made as per the wishes of their clients.


Model Photo Retouching
To start Price is only $2.00 – $4.99
Every photo may not look perfect after a photoshoot. If you want to get quality output, you must go for photo editing or retouching. Photo Retouching is a post-production photo editing service where the retoucher makes the photo clean & polished and removes the unexpected things from the image. Our company enables you to customize your retouching needs.


Jewellery Retouching


Below are some pictures of us


Features:
◎ Headshot Retouching
◎ Patroite Retouching
◎ High-End Retouching
◎ Retouching & Enhancing
◎ Color Correction
◎ Enhancing/adjusting color, lightening contrast
◎ Adjust color, contrast, lighting, exposure, and sharpness
◎ Removing Pimple Blemishes & Any Spots
◎ Wedding photo retouching
◎ A_Z Photoshop Editing

Photo retouching in Photoshop involves enhancing and correcting images to improve their overall appearance. Here’s a step-by-step guide to common retouching techniques:
1. Basic Adjustments
Open Your Image
- Launch Photoshop and open the image you want to retouch.
Adjust Brightness and Contrast
- Go to Image > Adjustments > Brightness/Contrast to improve overall light and contrast.
Adjust Color Balance
- Use Image > Adjustments > Color Balance to tweak colors, making them warmer or cooler.
2. Retouching Skin
Spot Healing Brush Tool
- Select the Spot Healing Brush Tool (J) from the toolbar.
- Adjust the brush size and click on blemishes or imperfections to remove them.
Clone Stamp Tool
- Select the Clone Stamp Tool (S).
- Hold Alt (Option on Mac) and click to sample an area.
- Paint over the area you want to retouch.
Frequency Separation (Advanced)
- For more professional results, consider using frequency separation to separate texture and color.
- Duplicate the layer twice.
- On the first duplicate, apply a Gaussian Blur to blur the colors.
- On the second duplicate, apply the High Pass filter to retain texture.
- Use the Clone Stamp or Healing Brush on the blurred layer to smooth out skin tones, and adjust the visibility of each layer.
3. Enhancing Features
Brightening Eyes
- Zoom into the eyes and use the Elliptical Marquee Tool (M) to select the iris.
- Go to Image > Adjustments > Brightness/Contrast or Image > Adjustments > Levels to brighten the eyes.
- Deselect the selection (Ctrl + D or Command + D).
Whitening Teeth
- Select the teeth using the Lasso Tool (L).
- Use Image > Adjustments > Hue/Saturation and reduce the yellow to whiten the teeth.
4. Sharpening the Image
- Duplicate the image layer.
- Go to Filter > Sharpen > Unsharp Mask or Filter > Sharpen > Smart Sharpen.
- Adjust the sliders to enhance the details without introducing too much noise.
5. Final Touches
Crop and Straighten
- Use the Crop Tool (C) to crop out unwanted areas and straighten the image if needed.
Apply a Vignette
- Create a new layer and fill it with black.
- Use the Elliptical Marquee Tool to create an oval selection in the center.
- Invert the selection (Shift + Ctrl + I or Shift + Command + I) and press delete.
- Adjust the layer opacity to achieve the desired vignette effect.
6. Save Your Work
- Save your file as a PSD to keep layers intact. Export as JPEG or PNG for sharing.
Tips for Effective Retouching
- Non-Destructive Editing: Use adjustment layers and masks to keep your edits reversible.
- Zoom In/Out: Work closely on details but regularly zoom out to see the overall effect.
- Take Breaks: Stepping away helps you return with fresh eyes to spot any missed areas.